Metrics quickstart
This section documents how to enable metrics reporting on the Policy Server.
Before continuing, make sure you completed the previous OpenTelemetry section of this book. You need it for this section to work correctly.
You use Prometheus to collect metrics exposed by the Policy Server.
Install Prometheus
You use the Prometheus Operator, that lets define Prometheus' targets.
There are many ways to install and set up Prometheus. For ease of deployment, you should use the Prometheus community Helm chart.
The Prometheus Operator deployed with this Helm chart uses Service Monitors to define which services Prometheus should monitor.
In your case, you are adding a ServiceMonitor targeting the kubewarden
namespace for services that match labels app=kubewarden-policy-server-default
and app.kubernetes.io/name: kubewarden-controller. This configures the
Prometheus Operator to inspect which Kubernetes endpoints belong to services
matching these conditions.
You can create two ServiceMonitors named kubewarden-controller and
kubewarden-policy-server for use by the default Prometheus instance installed
by the Helm chart. To do that, you should create the following values file:
cat <<EOF > kube-prometheus-stack-values.yaml
prometheus:
  additionalServiceMonitors:
    - name: kubewarden
      selector:
        matchLabels:
          app: kubewarden-policy-server-default
      namespaceSelector:
        matchNames:
          - kubewarden
      endpoints:
        - port: metrics
          interval: 10s
    - name: kubewarden-controller
      selector:
        matchLabels:
          app.kubernetes.io/name: kubewarden-controller
      namespaceSelector:
        matchNames:
          - kubewarden
      endpoints:
        - port: metrics
          interval: 10s
EOF
You should install the Prometheus stack Helm chart:
At time of writing (2023-11-17) the latest chart version is 51.5.3
helm repo add prometheus-community https://prometheus-community.github.io/helm-charts

helm install --wait --create-namespace \
  --namespace prometheus \
  --version 51.5.3 \
  --values kube-prometheus-stack-values.yaml \
  prometheus prometheus-community/kube-prometheus-stack
Install Kubewarden
You can now install Kubewarden, in the recommended way, using Helm charts.
cert-manager is a requirement of OpenTelemetry, but you have already installed it in a previous section of this book.
First, you should add the Helm repository that contains Kubewarden:
helm repo add kubewarden https://charts.kubewarden.io
Then you install the Custom Resource Definitions (CRDs) defined by Kubewarden:
helm install --wait \
  --namespace kubewarden --create-namespace \
  kubewarden-crds kubewarden/kubewarden-crds
Now you can deploy the rest of the Kubewarden stack. The official helm
chart creates a PolicyServer named default.
You should configure the Helm chart so that you have metrics enabled in
Kubewarden. The kubewarden-values.yaml file should have the following
contents:
telemetry:
  mode: sidecar
  metrics: True
  sidecar:
    metrics:
      port: 8080
Now, install the helm charts:
helm install --wait \
  --namespace kubewarden \
  --create-namespace \
  --values kubewarden-values.yaml \
  kubewarden-controller kubewarden/kubewarden-controller

helm install --wait \
  --namespace kubewarden \
  --create-namespace \
  kubewarden-defaults kubewarden/kubewarden-defaults \
  --set recommendedPolicies.enabled=True \
  --set recommendedPolicies.defaultPolicyMode=monitor
This creates the default instance of PolicyServer:
kubectl get policyservers.policies.kubewarden.io
NAME      AGE
default   3m7s
By default, this policy server doesn't have metrics enabled.
Accessing Prometheus
Prometheus exposes a UI that you can use to inspect metrics exposed by different components within your Kubernetes cluster.
You can forward the Prometheus port so you can access it.
kubectl port-forward -n prometheus --address 0.0.0.0 svc/prometheus-operated 9090
Now, you can visit Prometheus on port 9090 and perform a query, for example:
kubewarden_policy_evaluations_total. You see that the number of evaluations
grows over time as more requests go through the policy.
Accessing Grafana
You can forward the Grafana service so you can access it.
kubectl port-forward -n prometheus --address 0.0.0.0 svc/prometheus-grafana 8080:80
You can now login with the default username admin and password prom-operator.
Using the Kubewarden Grafana dashboard
Kubewarden has a Grafana dashboard with basic metrics giving an overview about
how Kubewarden behaves in the cluster. This dashboard is available in the
GitHub releases of the Kubewarden policy-server repository as a JSON
file
or at the Grafana website.
To import the dashboard into your environment, you can download the JSON file from the Grafana website or the repository:
curl https://github.com/kubewarden/policy-server/releases/latest/download/kubewarden-dashboard.json
Once you have the file you should access the Grafana dashboard and import
it.
Visit /dashboard/import in the Grafana dashboard and follow these steps:
- Copy and paste the JSON file contents into the
Import via panel jsonbox in the Grafana UI. - Click the
Loadbutton. - Choose
Prometheusas the source. - Click the
Importbutton.
Another option is import it directly from the Grafana.com website. For this:
- Copy the dashboard ID from the dashboard page,
- Paste it into the
Import via grafana.comfield. - Click the
loadbutton. - After importing the dashboard, define the Prometheus data source to use and finish the import process.
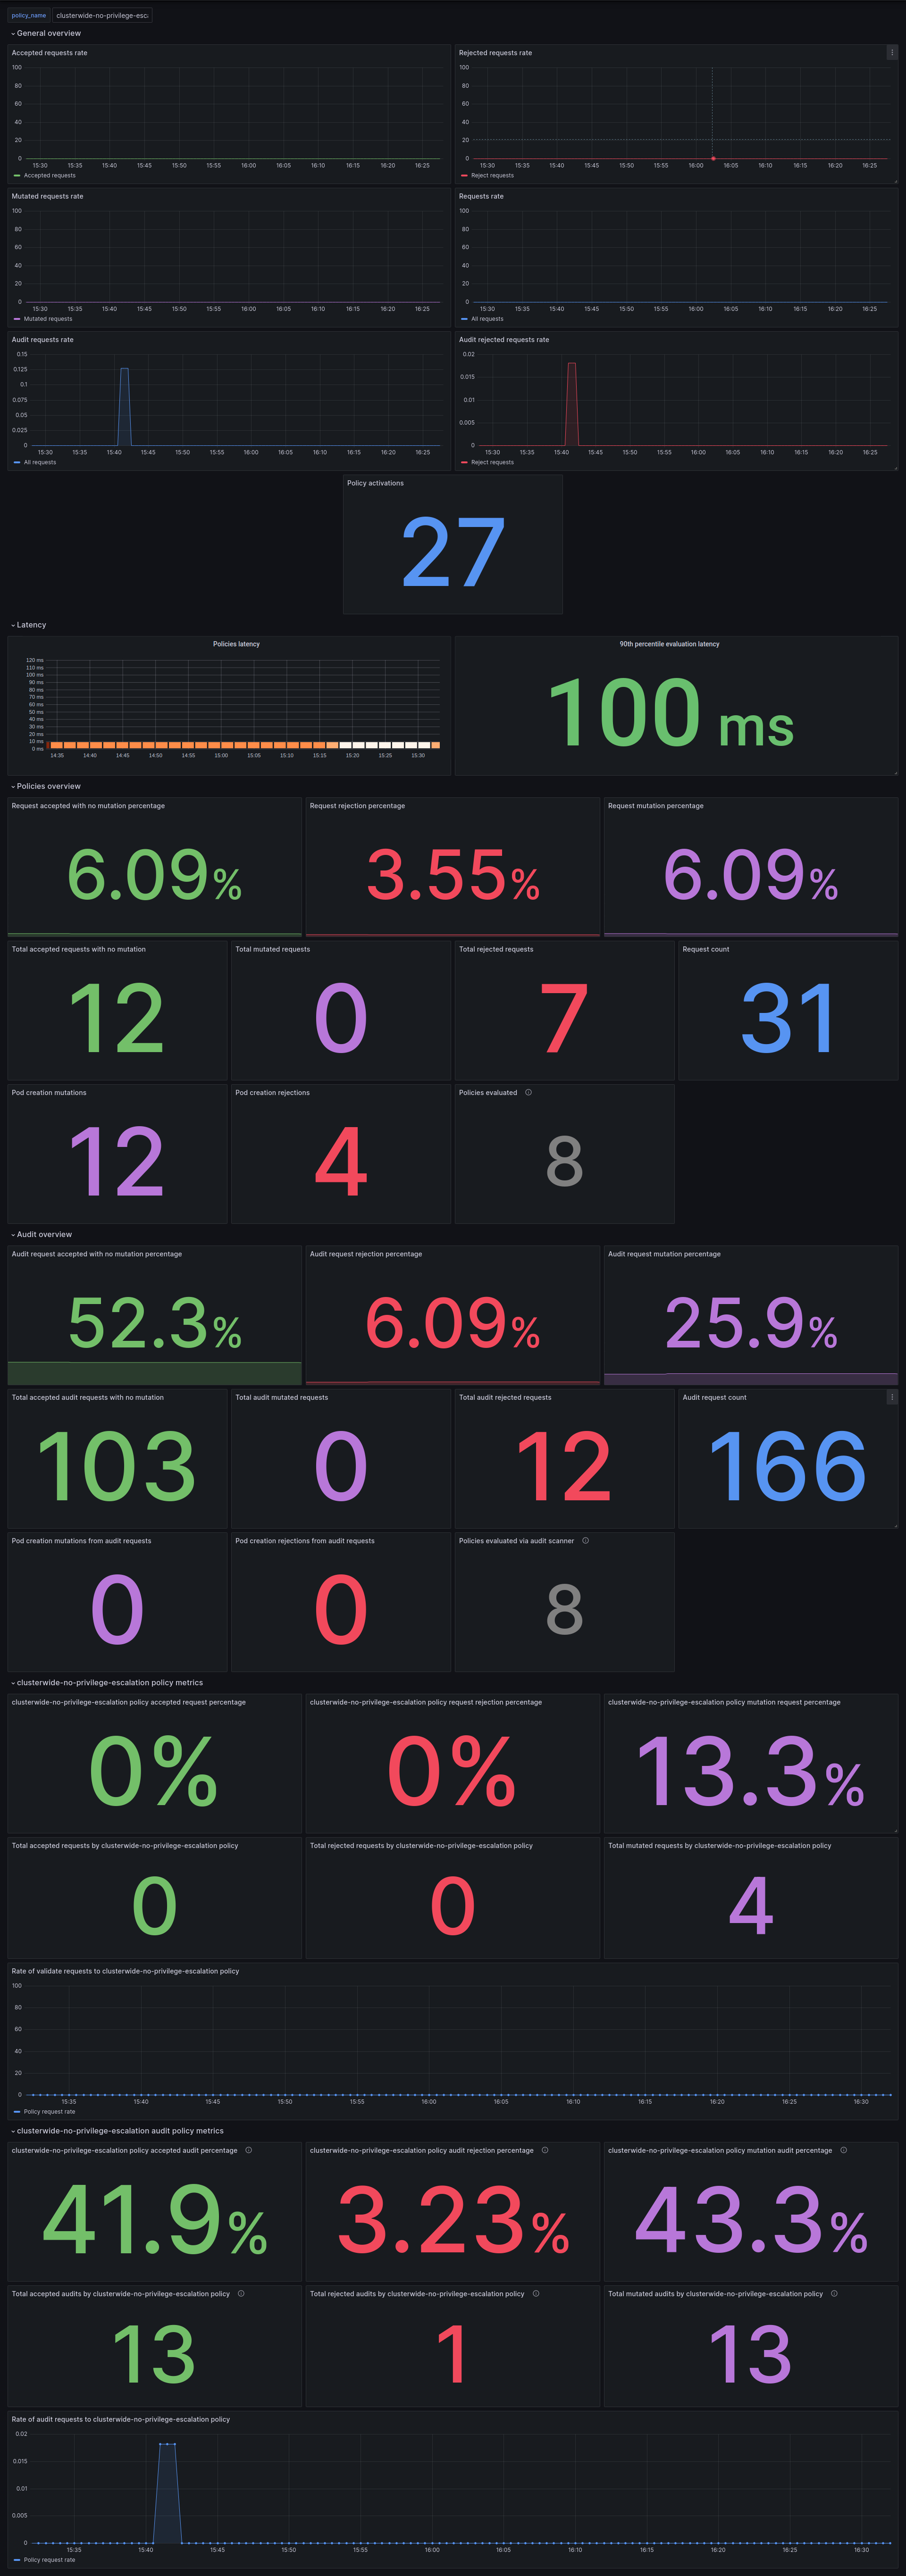
The Grafana dashboard has panes showing the state of all policies managed by Kubewarden. It also has policy-specific panels.
You can obtain detailed metrics for a specific policy by changing the value of
the policy_name variable to match the required policy's name.
You should be able to see the dashboard similar to this: